Keep your potatoes, beets, carrots, parsnips, turnips, cabbage, and other root crops in the ground this winter and harvest them as they are needed. Cut off the tops and cover these vegetables with a thick layer of leaves, straw or hay to keep the ground warm. Depending on how cold it gets in your area, the mulch layer may need to be four inches or more in thickness. These vegetables need to be mulched as soon as possible so don’t wait too long. Once the ground freezes (about mid-December in Grand Junction, CO) it is too late.
When you need these vegetables move the mulch aside and dig what you need. Replace the mulch to keep the ground warm. Be sure to have all these vegetables dug by spring. As soon as these vegetables start to grow in the spring their eating quality will be significantly reduced.
This technique of overwintering your root crops is more successful when you have a sandy soil. If the soil is heavy and you have a lot of rain or snow try to keep the soil dry. Cover the mulch layer with a tarp that sheds water. Dig a trench at the edge of the tarp to direct water away from the mulched area.
If you have a heavy clay soil and can’t keep it dry, dig a trench and fill it with dry straw, hay or leaves. Place the root vegetables on this layer and apply more straw, hay, or leaves to fill the trench. Cover the trench with a tarp if you get a lot of snow or rain. The layers of straw, hay, or straw allow the soil to drain and help keep the vegetables dry and free from rot.
Previous recommendations for overwintering cabbage included the removal of the outer layer of cabbage leaves and the head of cabbage dipped in hot wax. The wax-dipped head of cabbage could be hung in an area where the temperature was just above freezing or layered in the mulch-filled trench. This was said to increase the ability to overwinter cabbage. I’m not sure if this is necessary. No matter how you over winter cabbage the outer leaves will often rot and need to be removed before use.
If you prefer to freeze or can these vegetables, or turn your cabbage into sauerkraut, you can learn more about how to do this safely by contacting Rhonda Follman at the Colorado State University Extension office at 970 244-1834 or Rhonda.Follman@colostate.edu.
Sunday, November 27, 2011
Wednesday, November 23, 2011
Lavender Christmas Craft Fair and Bake Sale – December 3, 10 a.m. to 3 pm, Mesa County Fairgrounds
Lavender Christmas Craft Fair and Bake Sale – December 3, 10 am to 3 pm Mesa County Fairgrounds Free admission
 The Lavender Association of Western Colorado will host their 3rd annual Christmas Craft Fair and Bake Sale on Saturday, December 3 from 10 a.m. to 3 pm at the Mesa County Fairgrounds. Local vendors will be selling lavender-inspired hand crafted gifts to include gift baskets, spa, bath and body items, culinary lavender blends, wreaths, etc.
A wide variety of gift items at the silent auction!
Demonstrations on using lavender!
Intellitec College massage therapy students with their massage chairs!
Bake sale featuring delicious sweet treats, hot coffee, tea, hot chocolate, and cider.
Proceeds from the silent auction and bake sale will go to further the goal of promoting the local lavender industry through research, education, marketing and networking.
Fertilizing gardens in the fall, winter, and spring can be a bad idea!
Organic matter and synthetic nitrogen fertilizers are often applied to gardens, trees, shrubs, pastures, and field crops in the fall, winter, and early spring months. Losses of up to 70% of the nitrogen as ammonia (NH3) can occur before next season’s growing season if not done properly. In addition to the loss of a valuable plant nutrient a reduction in air quality can result. Ammonia creates smog by combining with nitrous oxides (NOx). The result is a hazy view and deposits in your lungs and the lungs of other animals.
Microbial activity of Bacillus, Clostridium, Proteus, Pseudomonas, and Streptomyces bacteria change organic nitrogen into ammonia as soil and air temperatures increase in the spring. To prevent nitrogen loss from organic matter applied to a garden it should be worked into the soil and not left on the soil surface. When applied as top dressing to a lawn, organic matter should be raked into aeration holes to move as much of the product into the soil as possible.
The synthetic fertilizer urea (46% Nitrogen) can start to breakdown as soon as it is applied to the soil. If the soil is totally dry, no reaction happens. If there is a small amount of soil moisture present this fertilizer can hydrolyze and convert to ammonium and carbon dioxide within two to four days. This is more of a problem in high pH soil areas.
CO(NH2)2 + H2O + urease = 2NH3 + CO2
(urea)
It was commonly thought volatilization of urea was more problematic when air temperatures were 50 oF. or above. More recent research has shown volatilization of urea even occurs when temperatures are below 41 oF.1 The same high loses can occur when urea fertilizer is applied to frozen soil. When at least one-half inch of irrigation water (or rain) occurs after application of urea, losses can be significantly reduced. Working urea into the soil also reduces nitrogen losses.
When Ammonium Sulfate (21% N) is applied to soil, very little or no conversion to ammonia (NH3) occurs making this a very good nitrogen fertilizer.
1. Engle, R., and Jones, C. Choosing your Nitrogen Fertilizers based on Ammonia Volatilization. Nutrient Digest. Fall 2011; vol3 (1).
Friday, October 14, 2011
An application of fertilizer this time of year is recommended!
Fertilizing your lawn in the fall can increase root depth and create a more drought and disease/insect tolerant lawn next year.
The nitrogen used should be a quick-release nitrogen (N) fertilizer with a small amount or no phosphorus (P) or potassium (K). Ammonium sulfate (~21% N), ammonium nitrate (33%N), and urea (~46% N) are ideal as they do not contain P or K. Slow-release products are not appropriate at this time of year. Two pound of N should be applied over every one-thousand square foot area of lawn. This recommendation means applying about ten pounds of ammonium sulfate, six pounds of ammonium nitrate, or four pounds of urea per one-thousand square feet of lawn. The goal is to provide a quick source of nitrogen to increase rooting depth and increase carbohydrate storage. This creates a healthier lawn more resistant to winter, spring, and summer disease and insect pests. If your lawn is a warm-season grass such as buffalograss you are out of luck as this procedure does not work on these grasses. If your lawn is Kentucky bluegrass, tall fescue, or perennial ryegrass applying two pounds of nitrogen at this time of year is what you should be doing.
Watering is critical to dissolve the fertilizer and move it into the roots of the grass. If your soil is the typical silt clay loam common to the valleys of western Colorado you should water your lawn for fifteen minutes if you have pop-up spray sprinklers, or fifty minutes if your sprinkler system has impact or rotary stream nozzles. Split these times in half with an hour between each watering to ensure the water penetrates the soil and doesn’t run off the lawn.
To learn more about this Late Season Fertilization program go to my web page at: http://www.coopext.colostate.edu/TRA/PLANTS/turf-lsf.shtml.
Friday, October 7, 2011
Master Gardener Tree Auction and Plant Sale - Oct 8, 2011


2011 Tree Inventory
Ash, Patmore - 8
Birch – Jacquemanii -1
Boxxelder – 3
Catalpa, western – 1
Catalpa, umbrella – 1
Colo blue spruce – 35
Cottonwood, narrowleaf – 4
Crabapple, Dubloons – 4
Crabapple – Indian magic – 1
Crabapple, Radiant – 7
Crabapple, Snowdrift – 1
Dawn redwood – 1
Hackberry – 6
Hawthorne, Paul’s scarlet – 4
Hawthorne, Washington – 2 sm, 2 lg
Juniper, Spartan (poodle cut) – 1
Linden, red twig – 1
Locust, purple robe – 1
Locust, sky line honey – 1
Maple, Hot wings tatarian – 6
Maple, Pacific sunset - 1
Mulberry, fruitless – 1
Mulberry, weeping - 2
Oak, bur – 2
Oak, gambel – 4
Plum, Newport – 1
Pussy willow, weeping - 1
Quaking aspen – 22
Redbud – 2
Yellowhorn – 2
Zelkova - 3
"The Tri River Area Master Gardeners are our horticulture volunteers, who provide education and information for home gardeners. They answer gardening questions, identify plant problems and provide research-based solutions. They test soil and water for salts and can make recommendations for improving the situation if necessary. They are available to give presentations, workshops, classes and garden tours, and can even make house calls. They greatly increase the outreach the horticulture department is able to provide. They also maintain our four acres of demonstration gardens here on the Mesa County fairgrounds.
Master Gardeners commit each year to a certain amount of work for us, and to keep up to date in the field of horticulture they also commit to continuing education. To assist in this regard, we have a Master Gardener scholarship fund, which they can draw on to attend conferences and workshops. Which brings us back to the Tree Auction and Plant Sale, our annual fund-raiser for the scholarship program. Master Gardeners have used this fund to attend lavender conferences, Pro Green Expo in Denver, and for numerous classes and workshops. We believe that through these educational opportunities they become even more valuable resources for their communities.
The trees and other plants are donated each year by nurseries and garden centers throughout our four county area. We’re very grateful to these generous businesses for their support of our program. This year’s donors include Beaver Lakes Nursery, Bookcliff Gardens, Camelot Gardens, Chelsea Nursery, Clarke and Company, Eckels Tree Farm and Hydroseeding, The Garden Center, Green Fields Seed and Feed, Leroux Creek Nursery, Meadowlark Gardens, Mile High Greenhouse, Mount Garfield Greenhouse and Nursery, Okagawa Farms, Palisade Greenhouse, Rocky Comfort Nursery, Southwest Soils, Spruce Point Tree Farm, Sticks and Stones, Sutherland’s, Valley Grown Nursery and Willow Bend Farms. Many individuals have also donated. A special thanks goes to our friend and supporter Vince Urbina, whose beautiful trees are always a big hit at the auction.
Fall is a great time to plant in our area. Our mild fall weather makes it easy for roots to become established without causing a lot of stress to the trees and shrubs. The plants for the most part have already hardened off for winter, and are less susceptible to water loss. Many trees actually do best when planted in the fall, so come on out to the fairgrounds, enjoy the day with us, visit our amazing gardens, and take home some great bargains for your own garden.
The Apprentice Master Gardener course will be starting next year on January 18, and run every Wednesday through March 28. This course, which is the foundation of the Master Gardener program, provides an extensive college-level introduction to horticulture in Western Colorado. Following the course, the Master Gardeners are available in our Mesa, Delta, and Montrose County offices to assist our clients as I mentioned above. We learn a lot, meet great people and have a lot of fun in the process. If you’d like to learn more about this rewarding volunteer opportunity, give me a call at 244-1841." Information Provided by Susan Rose, Master Gardener Coordinator, CSU Extension, Tri River Area.
Friday, September 16, 2011
Butternut Squash and Growth Cracks.
As autumn approaches butternut and other winter squash (to include pumpkin) develop a hard skin. This permits the storage of these fruits for several months. Once this hardening process starts anything that encourages further growth of the fruit may result in splitting of the fruit as is seen in these photos. A heavy rain or application of water after the fruit starts to harden its skin can stimulate growth and result in the cracking of the fruit. Applying nitrogen at the wrong time can also cause splitting.

 Vine crops like butternut squash should be side-dressed in midseason as they start to vine. At that time 2.5 ounces of nitrogen should be applied for each 250 feet of row. Fertilizing much later or with more than recommended above can stimulate growth resulting in cracking. See http://www.coopext.colostate.edu/TRA/PLANTS/Nitrogen%20Recommendations%20-%20Vegetables.pdf for details on fertilizing vegetables in the summer.

The crystalline substance on the edge of the cracks is due to plant juices that oozed from the damaged tissue.


The crystalline substance on the edge of the cracks is due to plant juices that oozed from the damaged tissue.
Thursday, September 15, 2011
Pearleaf Blister Mite - no need to spray now!
The pearleaf blister mite has been feeding on pear leaves all season. The damage it causes is minor even though the leaf below appears to be devasted by this mite. At this time of year there is no reason to spray as the leaves will be dropping soon anyway.
These mites live inside the leaf between the upper and lower surfaces. To see how they get into the leaf check out http://swiftsgardeningblog.blogspot.com/2010/06/brown-spots-on-pear-leaves.html.
 |
| Under side of the leaf |
You can prevent this damage from being severe by treating your pear trees with a dormant oil spray in the spring just as the buds start to swell and the first hint of green appears. For a more indepth spray guide, check out the publication at http://www.ext.colostate.edu/pubs/garden/02800.html.
 |
| Upper surface of the leaf. |
You can enhance winter hardiness of your grape vines by proper fall watering
How do you ensure your vineyard, whether consisting of acres of vines, or just a few vines in your back yard, has the best chance of making it through the winter without suffering winter damage?
At this time of year (September) you should stop watering your grapes to encourage them to acclimate properly for winter. While you can’t control the rains you can certainly turn off the watering system to your grape vines for the next month. If your vines are less than one year old watering should have been stopped by mid-August or even earlier. Young vines are much more vigorous than older vines and need more encouragement to acclimate properly for winter. Withholding water provides that encouragement. You should also avoid the application of any nitrogen fertilizer at this time of year as this can stimulate growth resulting in winter damage.
After the first fall frost (but no sooner than October 15)
Turn your irrigation system back on and thoroughly water the vineyard. The roots of your grapes may be three, four, or five feet deep thus it may take hours to apply enough water to fill the soil profile to the lower depth of the roots.
If your grapevines are irrigated by a drip system you may need to water for 8 to 10 hours per day for three days to apply adequate water.
If you are using a sprinkler system apply a foot of water. Apply it slowly to allow it to be absorbed by the soil and not run off. Many sprinkler systems apply an inch of water or more per hour so you will need to turn off the sprinklers. This is much too fast for the water to be absorbed by the soil. When the water starts to run off. Wait an hour and turn the system back on. You may have to do this a number of times to apply the amount of water needed by the plants to carry them through until spring.
Ditch vs. Domestic Water
If you use irrigation water the ditch may be shut off before mid-October requiring you to irrigate earlier than the first frost. If you have access to treated water, delay this last application of water of the season until after October 15. Don’t make the mistake of using well water or water from a drain ditch to irrigate your vines unless you have tested it for salts and the sodium adsorption ratio (SAR) and been approved for irrigation use. Once you have watered for the last time of the season be sure to winterize the system to avoid winter damage and costly repairs next spring. If the winter is open and dry watering your vineyard in mid-winter is recommended.
---------------
The first fall frost in Mesa, Delta, Montrose, and Ouray counties varies with the community as can be seen on the web page at http://www.coopext.colostate.edu//TRA/PLANTS/climate.shtml .
Information on SAR is at http://www.coopext.colostate.edu/TRA/PLANTS/sar.html.
See the fact sheet on winterizing your irrigation system at http://www.ext.colostate.edu/pubs/crops/04719.html.
Information on winter watering is at http://www.ext.colostate.edu/pubs/garden/07211.pdf.
At this time of year (September) you should stop watering your grapes to encourage them to acclimate properly for winter. While you can’t control the rains you can certainly turn off the watering system to your grape vines for the next month. If your vines are less than one year old watering should have been stopped by mid-August or even earlier. Young vines are much more vigorous than older vines and need more encouragement to acclimate properly for winter. Withholding water provides that encouragement. You should also avoid the application of any nitrogen fertilizer at this time of year as this can stimulate growth resulting in winter damage.
After the first fall frost (but no sooner than October 15)
Turn your irrigation system back on and thoroughly water the vineyard. The roots of your grapes may be three, four, or five feet deep thus it may take hours to apply enough water to fill the soil profile to the lower depth of the roots.
 |
| Drip tube running along the lower wire of the trellis. |
If you are using a sprinkler system apply a foot of water. Apply it slowly to allow it to be absorbed by the soil and not run off. Many sprinkler systems apply an inch of water or more per hour so you will need to turn off the sprinklers. This is much too fast for the water to be absorbed by the soil. When the water starts to run off. Wait an hour and turn the system back on. You may have to do this a number of times to apply the amount of water needed by the plants to carry them through until spring.
Ditch vs. Domestic Water
If you use irrigation water the ditch may be shut off before mid-October requiring you to irrigate earlier than the first frost. If you have access to treated water, delay this last application of water of the season until after October 15. Don’t make the mistake of using well water or water from a drain ditch to irrigate your vines unless you have tested it for salts and the sodium adsorption ratio (SAR) and been approved for irrigation use. Once you have watered for the last time of the season be sure to winterize the system to avoid winter damage and costly repairs next spring. If the winter is open and dry watering your vineyard in mid-winter is recommended.
---------------
The first fall frost in Mesa, Delta, Montrose, and Ouray counties varies with the community as can be seen on the web page at http://www.coopext.colostate.edu//TRA/PLANTS/climate.shtml .
Information on SAR is at http://www.coopext.colostate.edu/TRA/PLANTS/sar.html.
See the fact sheet on winterizing your irrigation system at http://www.ext.colostate.edu/pubs/crops/04719.html.
Information on winter watering is at http://www.ext.colostate.edu/pubs/garden/07211.pdf.
Tuesday, September 13, 2011
Tomato Zippering

Sometimes damage to the fruit of a tomato plant can be caused by the weather. Zippering, obvious from the thin, brown, dead scar running from the stem scar down the side of the tomato, is one weather related problem we are current seeing.

Sometimes a small protrusion develops at the end of the zipper. Formed by anthers, the male parts of the flower, sticking to the newly forming fruit, zippers are more common when early fruit development occurs in cool weather.
Sometimes a hole opening into the locule forms. In this instance there is a small hole but it does not extend into the locule.

See http://plantpath.caes.uga.edu/extension/plants/vegetables/TomatoZippering.html for what happens when the hole extends into the locule.
Monday, September 12, 2011
Leaks in Irrigation System may be obvious.
 Note where the water is flooding out between the sidewalk and grass and has washed the sidewalk clean.
 |
| Sand and gravel on the sidewalk can be evidience of a leak in your underground irrigation system. |
Soil and gravel is being flushed onto the sidewalk by a broken sprinkler head or broken irrigation pipe. Note the area washed clean by the leak and the dirt on either side. This leak needs to be fixed or the concrete sidewalk will be undermined and fail. The repair will also help reduce water use. When you notice something like this happening be a good neighbor and let the owner know.

 |
| Closeup of point where water is escaping to the surface. |
Monday, August 29, 2011
Peachtree borer identification and control
The peachtree borer, AKA peach crown borer, (Synanthedon exitiosa) is a major pest of peach, nectarines, cherries, plums and other members of the genus Prunus whether grown for fruit production or as an ornamental. The adult is a clear-wing moth resembling a wasp. “The female is dark metallic blue with a broad, reddish orange band around the body on the fourth abdominal segment. The male is smaller with a shiny, dark metallic blue body”. [i]
Male and female photos courtesy of http://www3.telus.net/conrad/insects/peachtr2.html
When eggs are laid at the base of a peach or other stone fruit tree, the worms eat through the bark and feed on the cambium and inner bark (phloem) of the tree. Both the lower portion of the trunk and the upper roots are damaged.
Control
The Soil Drench Method
An insecticide drench with a relatively lengthy residual needs to be applied to the base of the tree in sufficient quantity to soak the ground. Since the entry point of this insect can be up to 8 inches above the soil line soaking the trunk to at least that height is important. Applications of carbaryl, permethrin, and esfenvalerate are recommended at the first of July and again at the beginning of August. If other products are used the length of time between applications will need to be adjusted based on the residual effect of the product. Do not apply these products within 14 days of harvest. When these sprays are missed, you can expect damage to your peach trees and other stone fruit trees and shrubs.
Para-dichlorobenzen (PDB)
Prior to 2009 the root systems of peach tree borer infested trees were fumigated using para-dichlorobenzene (PDB). This crystalline material is sold as moth balls and moth flakes. The crystals were placed in a shallow trench several inches out from the base of the tree or shrub and covered with a shallow layer of soil to contain the fumes. The fumes found their way through the goo to the borers feeding on the tree. This procedure was done in the fall when soil temperatures were above 50 degrees Fahrenheit. PDB can also damage plant tissue if placed directly against the bark of the tree. PDB did not replace the basal drenches recommended above but was a great way to clean up an infestation when a spray was missed or inadequate. PDB should not be confused with the moth balls and flakes containing naphthalene.
On October 31, 2006, Fertilome voluntarily requested US EPA terminate all uses of Fertilome Tree Borer Crystals. The product was registered for use on fruit trees but was no longer being produced in the United States. [2]
The Label is the Law
“Using a registered pesticide like mothballs against a pest not listed on the label is legal unless (1) the pesticide is used on a site not specified on the labeling or (2) the label specifically restricts the pests against which the pesticide may be used (e.g. “for use only against ants”). [3]
The container of Enoz Moth Ice Crystals I purchased on August 29, 2011, at the True Value Hardware store on Orchard Mesa does not specifically specify a site or restrict the products use against a specific pest. Based on the EPA statement at the beginning of this paragraph it appears this product can be legally used to fumigate the roots of peach tree borer infested trees.
Hand Worming
Hand worming is accomplished by removing the soil and goo around the base of the tree, finding the tunnels and pushing a flexible wire into the burrow to kill the borer. Hand worming is a major task especially when there are several hundred borer-infested trees to treat.
Mating Disruption
Some of the commercial peach orchards I walked this summer had globs of goo erupting from the soil at the base of their trees. Some growers have tried using pheromones to disrupt the mating flight of the moths and the reports are favorable as long as neighboring orchards are treated in the same manner. [4]
Nematodes
The use of insect parasitic nematodes such as Steinernema carpocapsae, S. feltiae, S. glaseri, Heterorhabditis heliothidis and H. bacteriophora are effective control options. The wrong type of soil, the wrong pH, chemicals in the soil, improper soil temperature, and many other factors affect the success of nematodes in their hunt for these borers.
A Quick Summary
Peach growers, whether backyard or commercial, will need to ensure they don’t miss the treatments necessary to control the peach tree borer, or they run the risk of losing their trees to this pest.
--------------------------------------------------------------------------------
[1] http://ento.psu.edu/extension/factsheets/peachtree-borer
[2] http://www.regulations.gov/#!documentDetail;D=EPA-HQ-OPP-2006-0934-0001
[3] http://www.epa.gov/pesticides/regulating/labels/label_review_faq.htm#exception
[4]http://oregonstate.edu/dept/nurspest/peach_tree_borer.htm
 |
| male |
 |
| female |
When eggs are laid at the base of a peach or other stone fruit tree, the worms eat through the bark and feed on the cambium and inner bark (phloem) of the tree. Both the lower portion of the trunk and the upper roots are damaged.
 |
| Figure 3: The initial feeding activity of the borer will appear as translucent goo that oozes from the ground. |
 |
| Figure 4: As the feeding continues, the goo will be colored by the frass produced by the feeding activity of the borer. This photo shows boring dust on the lower part of the trunk, black crusty goo, and pupal cases left behind when moths emerged. |
 |
| Figure 5: When you remove some of the crusty goo from the base of the tree you will often find clear goo underneath. |
A peach tree damaged by this insect may take years to die. The tree may die one branch at a time, or the whole tree may collapse over night. The leaves on a limb with damaged roots may yellow one day and drop to the ground the next day. The Fruit on a borer-infested tree will become dried up mummies.
 |
Figure 6: Nutrient uptake is hampered by the feeding activity of the borer causing chlorosis as shown on the left side of this tree. |
The Soil Drench Method
An insecticide drench with a relatively lengthy residual needs to be applied to the base of the tree in sufficient quantity to soak the ground. Since the entry point of this insect can be up to 8 inches above the soil line soaking the trunk to at least that height is important. Applications of carbaryl, permethrin, and esfenvalerate are recommended at the first of July and again at the beginning of August. If other products are used the length of time between applications will need to be adjusted based on the residual effect of the product. Do not apply these products within 14 days of harvest. When these sprays are missed, you can expect damage to your peach trees and other stone fruit trees and shrubs.
Para-dichlorobenzen (PDB)
Prior to 2009 the root systems of peach tree borer infested trees were fumigated using para-dichlorobenzene (PDB). This crystalline material is sold as moth balls and moth flakes. The crystals were placed in a shallow trench several inches out from the base of the tree or shrub and covered with a shallow layer of soil to contain the fumes. The fumes found their way through the goo to the borers feeding on the tree. This procedure was done in the fall when soil temperatures were above 50 degrees Fahrenheit. PDB can also damage plant tissue if placed directly against the bark of the tree. PDB did not replace the basal drenches recommended above but was a great way to clean up an infestation when a spray was missed or inadequate. PDB should not be confused with the moth balls and flakes containing naphthalene.
On October 31, 2006, Fertilome voluntarily requested US EPA terminate all uses of Fertilome Tree Borer Crystals. The product was registered for use on fruit trees but was no longer being produced in the United States. [2]
The Label is the Law
“Using a registered pesticide like mothballs against a pest not listed on the label is legal unless (1) the pesticide is used on a site not specified on the labeling or (2) the label specifically restricts the pests against which the pesticide may be used (e.g. “for use only against ants”). [3]
The container of Enoz Moth Ice Crystals I purchased on August 29, 2011, at the True Value Hardware store on Orchard Mesa does not specifically specify a site or restrict the products use against a specific pest. Based on the EPA statement at the beginning of this paragraph it appears this product can be legally used to fumigate the roots of peach tree borer infested trees.
Hand Worming
Hand worming is accomplished by removing the soil and goo around the base of the tree, finding the tunnels and pushing a flexible wire into the burrow to kill the borer. Hand worming is a major task especially when there are several hundred borer-infested trees to treat.
Mating Disruption
Some of the commercial peach orchards I walked this summer had globs of goo erupting from the soil at the base of their trees. Some growers have tried using pheromones to disrupt the mating flight of the moths and the reports are favorable as long as neighboring orchards are treated in the same manner. [4]
Nematodes
The use of insect parasitic nematodes such as Steinernema carpocapsae, S. feltiae, S. glaseri, Heterorhabditis heliothidis and H. bacteriophora are effective control options. The wrong type of soil, the wrong pH, chemicals in the soil, improper soil temperature, and many other factors affect the success of nematodes in their hunt for these borers.
A Quick Summary
Peach growers, whether backyard or commercial, will need to ensure they don’t miss the treatments necessary to control the peach tree borer, or they run the risk of losing their trees to this pest.
--------------------------------------------------------------------------------
[1] http://ento.psu.edu/extension/factsheets/peachtree-borer
[2] http://www.regulations.gov/#!documentDetail;D=EPA-HQ-OPP-2006-0934-0001
[3] http://www.epa.gov/pesticides/regulating/labels/label_review_faq.htm#exception
[4]http://oregonstate.edu/dept/nurspest/peach_tree_borer.htm
Wednesday, August 24, 2011
Lavender Research at Bob Korver's

This research project will provide the data necessary to compare the production of Bob’s 10 cultivars and determine if there is a significant difference in production when the flower stalks are removed vs. when they are left to develop. At this time there does not seem to be a difference in plant size between those plants that have had the flower stalks removed and those plants where the flower stalks were left on. A difference in yield however, may appear sometime over the next two years.
 |
| Shawn Douglas and Kay Stucker-Shilts cut off flowers and collect data |
Data will be collected through 2013 on growth rate and yield. The results of this research will be posted on my blog and web site. If funds are available the quality of the oil of the various cultivars will be determined by gas chromatography-mass spectrometry after the 2012 harvest.
This project is a cooperative venture of Bob and Elaine Korver, the Lavender Association of Western Colorado, and Colorado State University Extension. If you are interested in learning more get in touch with me at Curtis.Swift@colostate.edu.
Fall Webworms appearing in Cottonwoods and other Populus species
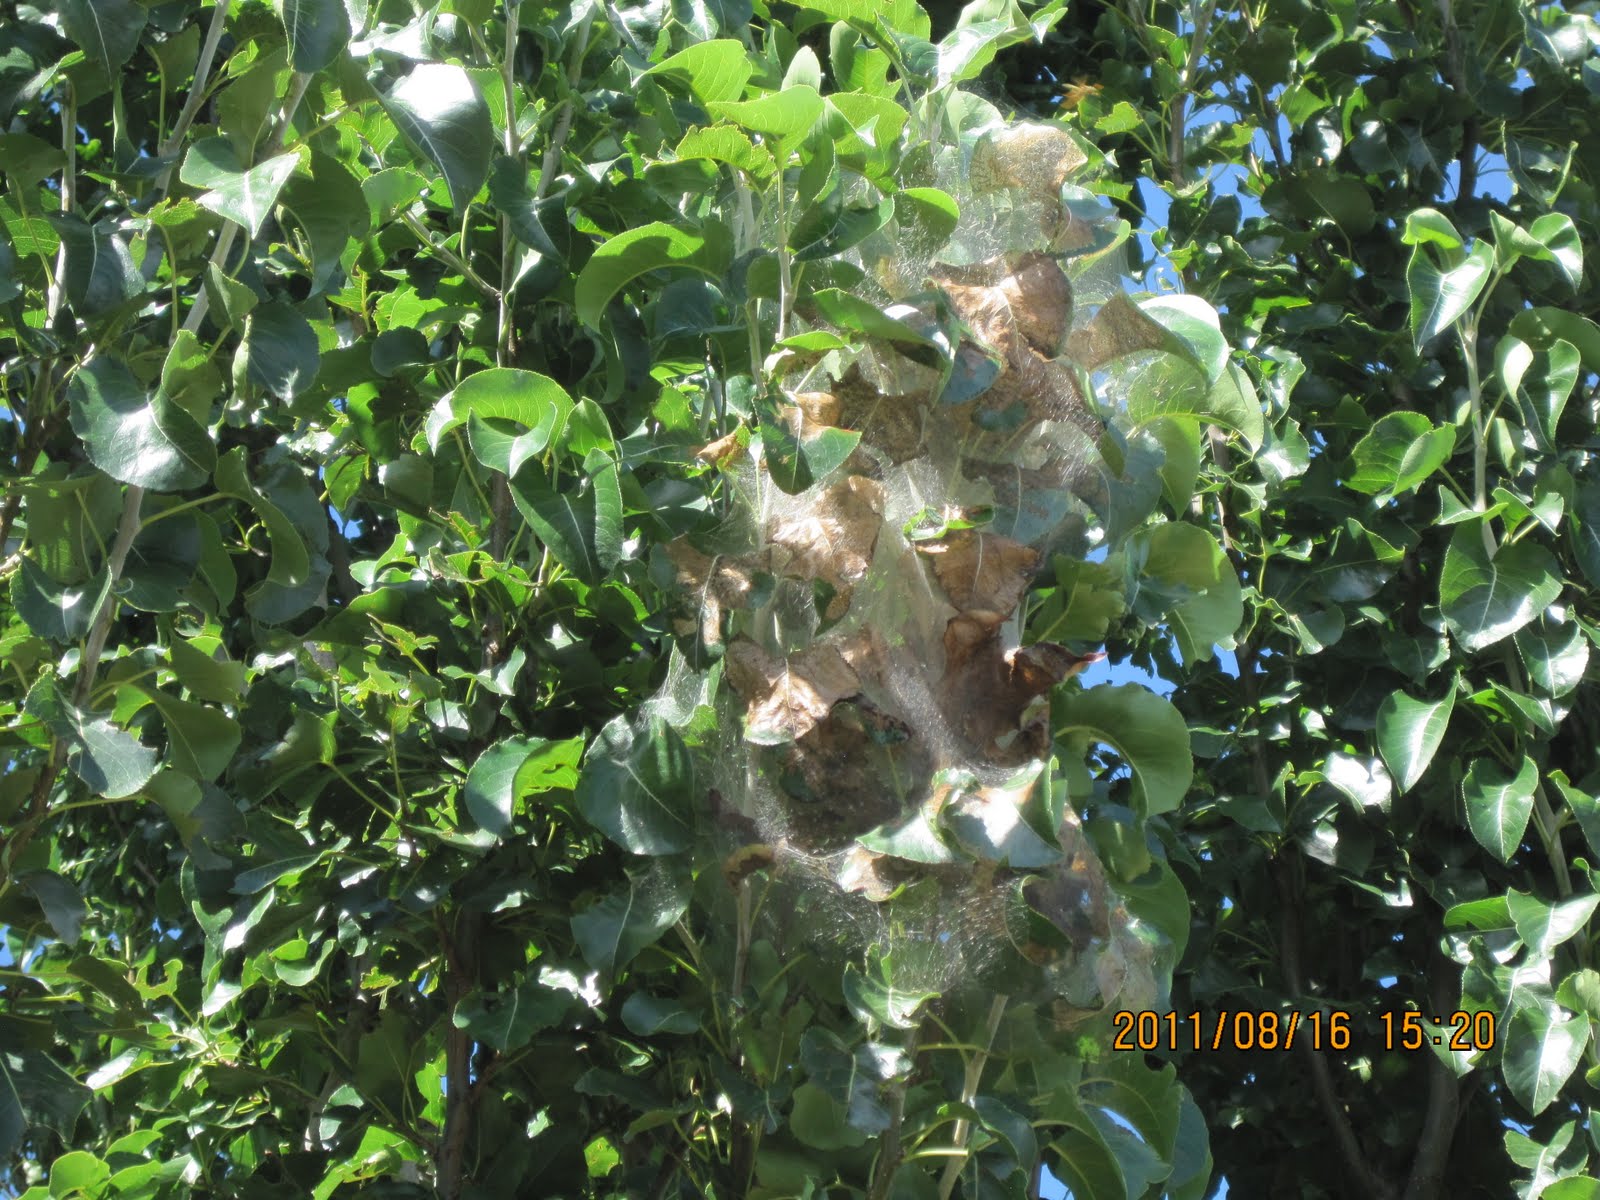
Fall Webworms are showing up in cottonwoods throughout western Colorado. This insect overwinters as a pupa in debris at the base of trees with the adults emerging, mating, and laying eggs in late summer on the twigs and branches where the caterpillars form their tents.
While cutting off the branches and burning the tents might seem like a good idea there are only so many branches you can remove without causing root damage. Cutting off branches also creates wounds through which pathogens can invade. Burning the tents while still on the tree is likewise not recommended as the damaged tissue can be highly susceptible to disease infection and insect attack. It would be better to let these caterpillars continue to feed than to remove or burn branches to control them. The tents are unsightly but unless the tree is severely stressed from some other malady, fall webworm infested trees most likely are not going to suffer from these beasties feasting away on a few leaves.
A spray of Bacillus thuringiensis (BT) and Pyganic are organic options. Pyrethroids such as permethrin, cyfluthrin and esfenvalerate are also recommended. Adding a non-ionic surfactant or a couple drops of liquid dishwashing soap per gallon of spray helps the spray penetrate the tent and reach the caterpillars within. Aspens are particularly sensitive to soaps and liquid concentrate sprays so test a small patch of leaves a day or so prior to spraying the complete tree to determine if the spray is phytotoxic. Or, leave out the soap.
Imidacloprid does not work on this insect as it is not effective on Lepidopteras (moths and butterflies).
The BT strains that work on lepidopteras are aizawai and kurstaki. See the web page at http://www.coopext.colostate.edu/TRA/PLANTS/btstrain.shtml for more info on the various strains of BT and the insects they are effective on.
The PyGanic label can be found at http://www.mgk.com/~/media/com/Files/Product-Labels/Branded%20Products/PyGanic_5_0_Specimen_Label.ashx?dl=true&dmc=1
Dr. Cranshaw’s publication on tent-forming caterpillars is at http://www.ext.colostate.edu/pubs/insect/05583.html.
Tuesday, August 23, 2011
Three-leaf Sumac and eriophyid mites
 |
| Lower Leaf Surface |
 |
| Upper Leaf Surface |
A spray of plain or soapy water usually is sufficient to wash these six-legged critters off the leaves. Be sure to wash both sides of the leaves paying more attention to the underside. See http://www.coopext.colostate.edu/TRA/PLANTS/erio.shtml for more info on these mites.
 |
| The orange carrot shapes to the left of the pin, the black line, are the mites. |
.
Tuesday, August 9, 2011
Increase the effectiveness of glyphosate herbicide by adding nitrogen
 |
| Shawn weighs out ammonium sulfate in the Mesa County CSU Lab. |
While this herbicide is much more effective on grassy weeds than broadleaf weeds (dandelions, purslane, bindweed, etc.) you can increase the overall effectiveness of this chemical by adding nitrogen to the spray. A spray mix containing 0.5 to 1% nitrogen is recommended.
So how do you figure out the amount of a nitrogen fertilizer to add to the glyphosate/water spray?
Let’s say you are mixing up five gallons of spray for a backpack sprayer. One gallon of mixed glyphosate and water weighs about 8.35 pounds, thus 5 gallons of this spray will weigh 41.75 pounds. The steps are as follows:
1. We first need to convert 0.5% to a decimal by moving the decimal point over two places to the left. This gives us 0.005.
2. We next multiply 41.75, the weight of the five gallons of spray by 0.005. (0.005 X 41.75 pounds = 0.209) That is the weight in pounds of nitrogen we need to add to the five gallons of spray.
3. We then can convert 0.209 to ounces. There are 16 ounces in a pound and 0.209 X 16 ounces = 3.34 ounces. Now we know the amount (3.34 ounces) of Nitrogen in ounces we need to add to the each five gallon tank of spray, but not the amount of fertilizer.
4. Fertilizers contain varying amounts of Nitrogen depending on their formulation. Ammonium sulfate contains 21% N; Ammonium nitrate 33%; and Urea 48%. For this exercise I’m going to use Ammonium sulfate.
5. We next have to convert 21% (the percentage of nitrogen in ammonium sulfate) to a decimal. WE do that by moving the decimal point two places to the left. (21% = .21 – there is a decimal between the 21 and the %, you just can’t see it.) We then divide 3.34 ounces (the amount of nitrogen we need) by .21. This gives us the amount of ammonium sulfate needs to be added to every 5 gallons of glyphosate spray. (3.34 divided by 0.21 = 15.9 ounces or one pound).
If you have an eight ounce cup handy, you would need to add two of these, full to the top, to the 5 gallons of spray. This will give you the 0.5% nitrogen mix you need.
To figure out the amount of ammonium nitrate or urea to use, divide the amount of nitrogen needed by the percentage (changed to a decimal) of nitrogen in the fertilizer.
Monday, August 8, 2011
Algae and Turfgrass
Curtis Swift, Ph.D., Colorado State University, Tri River Area
 |
| A mass of algae collected from a lawn. |
Maintaining a thick turf even in areas where shade is a problem, and avoiding water-logged soil and over-watering reduces problems with algae. Watering in late afternoon or early evening has been reported to increase problems with algae. Improving drainage through a vigorous aeration/core cultivation program is recommended. Top dressing to fill the aeration holes will improve drainage if the proper material is selected to fill the aeration holes. Applications of diluted solutions of sodium hypochlorite or liquid household beach (0.01%), copper sulfate (2 to 3 ounces per 1000 square foot area) are recommended treatments. Daconil (chlorthalonil) and Fore (mancozeb) are fungicides labeled for the management of algae.
When algae seal the soil surface and/or the spaces between the soil particles it fosters the development of a condition called anaerobiosis (an anaerobic environment caused by the presence of biotic/living organisms). In sandy soils this creates ‘Black Layer’, a film of bacteria an inch or so below the soil surface. This oxygen depleted environment, results in a toxic situation and subsequent root death. Deep aeration along with proper watering helps correct ‘Black Layer’, a widespread problem in sports turf management.
Smith (1988) reported the development of these anaerobiotic layers were more prevalent when urea was used as a fertilizer when compared with either ammonium nitrate or ammonium sulfate. Smith also found the addition of sulfur to a urea or ammonium sulfate application increased the severity of Black Layer.
As with the correction of algal formations on the soil surface, alleviation of problems with Black Layer is through proper turf management to include aeration.
References:
Beard, J.B. 1973. Turfgrass: Science and Culture. Prentice-Hall Inc. Englewood Cliffs, N.J.
Couch, H.B., 1995. Diseases of Turfgrasses: Third Edition. Krieger Publishing Company, Malabar, FL.
Schumann, G.L., Vittum, P.J., Elliott, M.L., Cobb, P.P. 1998. IPM Handbook for Golf Courses. Ann Arbor press, Inc. Chelsea, MI.
Shurtleff, M.C., Fermanian, T.W., & Randell, R. 1987. Controlling Turfgrass Pests. Prentice-Hall, Inc. N.J. 449 pages.
Smith, J.D. 1988. Black plug layer on Saskatchewan golf courses. Greenmaster 24(8): 6-11, 21.
Friday, August 5, 2011
Tuber Diseases of Irish Potato
Tuber Diseases of Irish Potato
The presence of Rhizoctonia and scab on Irish potatoes is an indication of soil conditions that need to be corrected before you plant your next crop of potatoes. The following explains how to identify these problems and provides the necessary guidance to prevent and correct problems with these diseases in the future.
Rhizoctonia – ‘the Dirt that Won’t Wash Off’
Rhizoctonia solani on potato tubers is often called the “dirt that can’t be washed off” due to the formation of hard black raised specs and spots (sclerotia) on the skin of the tuber. This fungus also attacks and causes lesions on the stems and roots of the plant causing plant death or reduced yield. Once in the soil this fungus can remain for years, hence the reason for following a rigorous crop rotation program. This means not planting potatoes in the same area for at least two to three years. If the soil is contaminated with Rhizoctonia planting a crop of grass or cereal in the rotation schedule helps reduce the presence of this plant pathogen.
Tubers selected for planting can be already infected with Rhizoctonia so check them carefully prior planting. Certified disease-free tubers should be free of this disease. Tubers being sold for table use, i.e. from the grocery store, may be infected with this and other potato pathogens.
The Rhizoctonia fungus survives in soil on infected tubers remaining from the previous year’s crop as well as on decomposing plant residue. Using finished compost free of animal waste is critical to preventing problems with this disease. Since the fungus is less likely to attack potato plants that have formed green leaves, the faster the potato plant emerges from the soil, the less likely the plant is to be infected. Planting when the soil is cool (55 – 60oF.), planting tubers deeper than two inches, and wet soil increase problems with this disease. Warming the soil prior to planting with clear plastic sheeting is suggested. Planting shallow encourages rapid emergence resulting in less infection. Hilling up the plants to ensure there is adequate depth of soil for tuber formation will still be necessary but only after plants emerge.
‘Common Scab’ of potatoes

Infection by scab creates roughly circular, raised, tan to brown, corky lesions on the tuber. Pits up to one-half inch deep on the tubers can result. Tubers infected with this disease organism are safe to consume but have a lower quality in the market place.
Common scab, caused by the bacterium Streptomyces scabies, is the scab organism of soils with a pH above 5.0. Acid scab caused by Streptomyces acidiscabies occurs in soils below a pH of 5.0. A third acid-loving Streptomyces species, S. turgidiscabies, along with S. acidiscabies, have only been reported in the northeastern Unites States and Japan. The scabby appearance of the tubers is due to the plant toxins produced by these bacteria. Other Streptomyces species are known in Europe and elsewhere causing russet or netted scab. Unlike the Streptomyces species of North America, these species are known to cause root rot and yield reduction.
Choosing disease-free tubers for planting, as with Rhizoctonia, is critical with this disease as scab can be introduced into the soil by planting scabby tubers.
Scabby potatoes are more common in areas where high soil organic content is the norm, especially when unfinished compost or animal manure is used as soil amendments. Even in soils where low organic content (the native soils in Western Colorado typically have less than 1% organic matter) is normal, potatoes can suffer from scab when the tubers develop in contact with pockets of organic matter. This scab-forming bacterium is a saprophyte surviving on fresh dead organic matter as well as seedlings. To prevent scab thoroughly work compost into the soil breaking up any clods in the process. Lasagna gardening and the use of straw or hay in which potatoes are grown often results in more problems with scab.
Maintaining adequate moisture (80 – 90%) during tuber development has been shown to reduce scab formation. A three to four year rotation with grasses and cereal crops helps reduce the incidence of scab. Rotations with carrot, beet, spinach, turnip, and radish should be avoided as these crops can increase scab problems with potatoes.
The use of scab resistant cultivars of potatoes is recommended.
Table 1 - Scab Susceptible and Resistant Cultivars
Table contents in part extracted from Rowe, R.C. 1993. Potato Health Management, APS Press.
The presence of Rhizoctonia and scab on Irish potatoes is an indication of soil conditions that need to be corrected before you plant your next crop of potatoes. The following explains how to identify these problems and provides the necessary guidance to prevent and correct problems with these diseases in the future.
Rhizoctonia – ‘the Dirt that Won’t Wash Off’
 |
| Photos Courtesy of http://potatodiseases.org/rhizoctonia.html |
Tubers selected for planting can be already infected with Rhizoctonia so check them carefully prior planting. Certified disease-free tubers should be free of this disease. Tubers being sold for table use, i.e. from the grocery store, may be infected with this and other potato pathogens.
The Rhizoctonia fungus survives in soil on infected tubers remaining from the previous year’s crop as well as on decomposing plant residue. Using finished compost free of animal waste is critical to preventing problems with this disease. Since the fungus is less likely to attack potato plants that have formed green leaves, the faster the potato plant emerges from the soil, the less likely the plant is to be infected. Planting when the soil is cool (55 – 60oF.), planting tubers deeper than two inches, and wet soil increase problems with this disease. Warming the soil prior to planting with clear plastic sheeting is suggested. Planting shallow encourages rapid emergence resulting in less infection. Hilling up the plants to ensure there is adequate depth of soil for tuber formation will still be necessary but only after plants emerge.
‘Common Scab’ of potatoes

Infection by scab creates roughly circular, raised, tan to brown, corky lesions on the tuber. Pits up to one-half inch deep on the tubers can result. Tubers infected with this disease organism are safe to consume but have a lower quality in the market place.
Common scab, caused by the bacterium Streptomyces scabies, is the scab organism of soils with a pH above 5.0. Acid scab caused by Streptomyces acidiscabies occurs in soils below a pH of 5.0. A third acid-loving Streptomyces species, S. turgidiscabies, along with S. acidiscabies, have only been reported in the northeastern Unites States and Japan. The scabby appearance of the tubers is due to the plant toxins produced by these bacteria. Other Streptomyces species are known in Europe and elsewhere causing russet or netted scab. Unlike the Streptomyces species of North America, these species are known to cause root rot and yield reduction.
Choosing disease-free tubers for planting, as with Rhizoctonia, is critical with this disease as scab can be introduced into the soil by planting scabby tubers.
Scabby potatoes are more common in areas where high soil organic content is the norm, especially when unfinished compost or animal manure is used as soil amendments. Even in soils where low organic content (the native soils in Western Colorado typically have less than 1% organic matter) is normal, potatoes can suffer from scab when the tubers develop in contact with pockets of organic matter. This scab-forming bacterium is a saprophyte surviving on fresh dead organic matter as well as seedlings. To prevent scab thoroughly work compost into the soil breaking up any clods in the process. Lasagna gardening and the use of straw or hay in which potatoes are grown often results in more problems with scab.
Maintaining adequate moisture (80 – 90%) during tuber development has been shown to reduce scab formation. A three to four year rotation with grasses and cereal crops helps reduce the incidence of scab. Rotations with carrot, beet, spinach, turnip, and radish should be avoided as these crops can increase scab problems with potatoes.
The use of scab resistant cultivars of potatoes is recommended.
Table 1 - Scab Susceptible and Resistant Cultivars
Scab Susceptible Cultivars | Moderately Scab Resistant Cultivars |
Centennial russet | Atlantic |
Chippewa | BelRus |
Denali | Conestoga |
Elba | Crystal |
Hampton | Islander |
Irish Cobbler | Kennebec |
Jemseg | LaRouge |
Kanona | Mona |
Kathadin | Norchip |
Red Pontiac | Norgold Russed |
Rosa | Norland |
Shepody | Onaway |
Steuben | Ontario |
White Rose | Pungo |
Yukon Gold | Rideau |
Russet Burbank | |
Sebago | |
Superior | |
Viking |
Table contents in part extracted from Rowe, R.C. 1993. Potato Health Management, APS Press.
Saturday, July 30, 2011
Killing Bermudagrass that invaded a strawberry patch
I sprayed my strawberry patch earlier today to rid it of invading Bermudagrass. Over the next three weeks the Bermudagrass will yellow and hopefully die. The product I used was Monterey’s Grass Getter containing Sethoxydim. Sethoxydim is available from numerous companies and sold under numerous brand names at your local nursery or garden center.
Sethoxydim can be sprayed over and near many vegetables as well as strawberries, raspberries, blackberries, flowers, shrubs, and trees. There is a waiting period between spraying Sethoxydim and harvesting the fruit or vegetable and that information is given in the product brochure.
Another over-the-top spray contains Fluazifop P Butyl. Products containing this active ingredient is commonly used to take grasses out of flowers and shrubs. These products are labeled for some edible crops to include ornamental strawberries but not on strawberries you eat.
My strawberry patch has finished bearing for the year, so this was a good time to spray it to take out Bermudagrass. This patch also has some nutsedge. Sethoxydim will not kill nutsedge so I’ll have to pull this by hand. Bermudagrass is much harder to control by pulling due to its very extensive and deep root system. If you are an organic gardening you’re out of luck.
There is no organic product that works the way Sethoxydim does. To remove Bermudagrass out of an organic strawberry patch you will need to dig it out.
After the grass has died back, I’ll mow the strawberry patch and fertilize. The mowing will remove dead and dying leaves that will serve as a source for strawberry disease organisms for next year. I’ll set the height of cut to remove the leaves but not damage the crown of the plants. The nitrogen fertilizer will stimulate new leaves and buds for next year’s crop. These steps will ensure I have a great harvest again next year.
 |
| Bermudagrass on the left; Nutsedge on the right. |
Another over-the-top spray contains Fluazifop P Butyl. Products containing this active ingredient is commonly used to take grasses out of flowers and shrubs. These products are labeled for some edible crops to include ornamental strawberries but not on strawberries you eat.
My strawberry patch has finished bearing for the year, so this was a good time to spray it to take out Bermudagrass. This patch also has some nutsedge. Sethoxydim will not kill nutsedge so I’ll have to pull this by hand. Bermudagrass is much harder to control by pulling due to its very extensive and deep root system. If you are an organic gardening you’re out of luck.
There is no organic product that works the way Sethoxydim does. To remove Bermudagrass out of an organic strawberry patch you will need to dig it out.
After the grass has died back, I’ll mow the strawberry patch and fertilize. The mowing will remove dead and dying leaves that will serve as a source for strawberry disease organisms for next year. I’ll set the height of cut to remove the leaves but not damage the crown of the plants. The nitrogen fertilizer will stimulate new leaves and buds for next year’s crop. These steps will ensure I have a great harvest again next year.
Thursday, July 28, 2011
Shading your plants can increase vegetable production and quality
In those parts of the world where sun light is intense and air temperature is hot providing shade cover for your vegetables can increase yield and quality.
A number of vegetables to include tomatoes, peppers, eggplant and okra drop flower buds and young fruit when the plant’s temperature exceeds 32 degrees C. (90 degrees F.). These plants also may abort flower buds and fruit when evening air temperatures drop below 10 degrees C. (50 degrees F.). Shading the plants helps correct these problems.
Even when air temperature exceeds 32 degrees C. (90 degrees F.) shading the plants helps keep the plant below this critical temperature. When shade is provided it also helps retain night temperatures above the critical 10 degrees C. (50 degrees Fahrenheit).
Shade cloth, sheeting or even brush stuck into the ground on the south and west sides of these plants can be used. Shade cloth, sheeting or other fabrics should be suspended above the plants. This will permit insects to reach the blossoms for pollination. Brush pushed into the ground on the south and west sides of these plants will also provide the shade necessary to increase production. Shading also helps prevent sun burn on tomatoes, egg plant, okra and other vegetables improving the length of time they can be kept in storage.
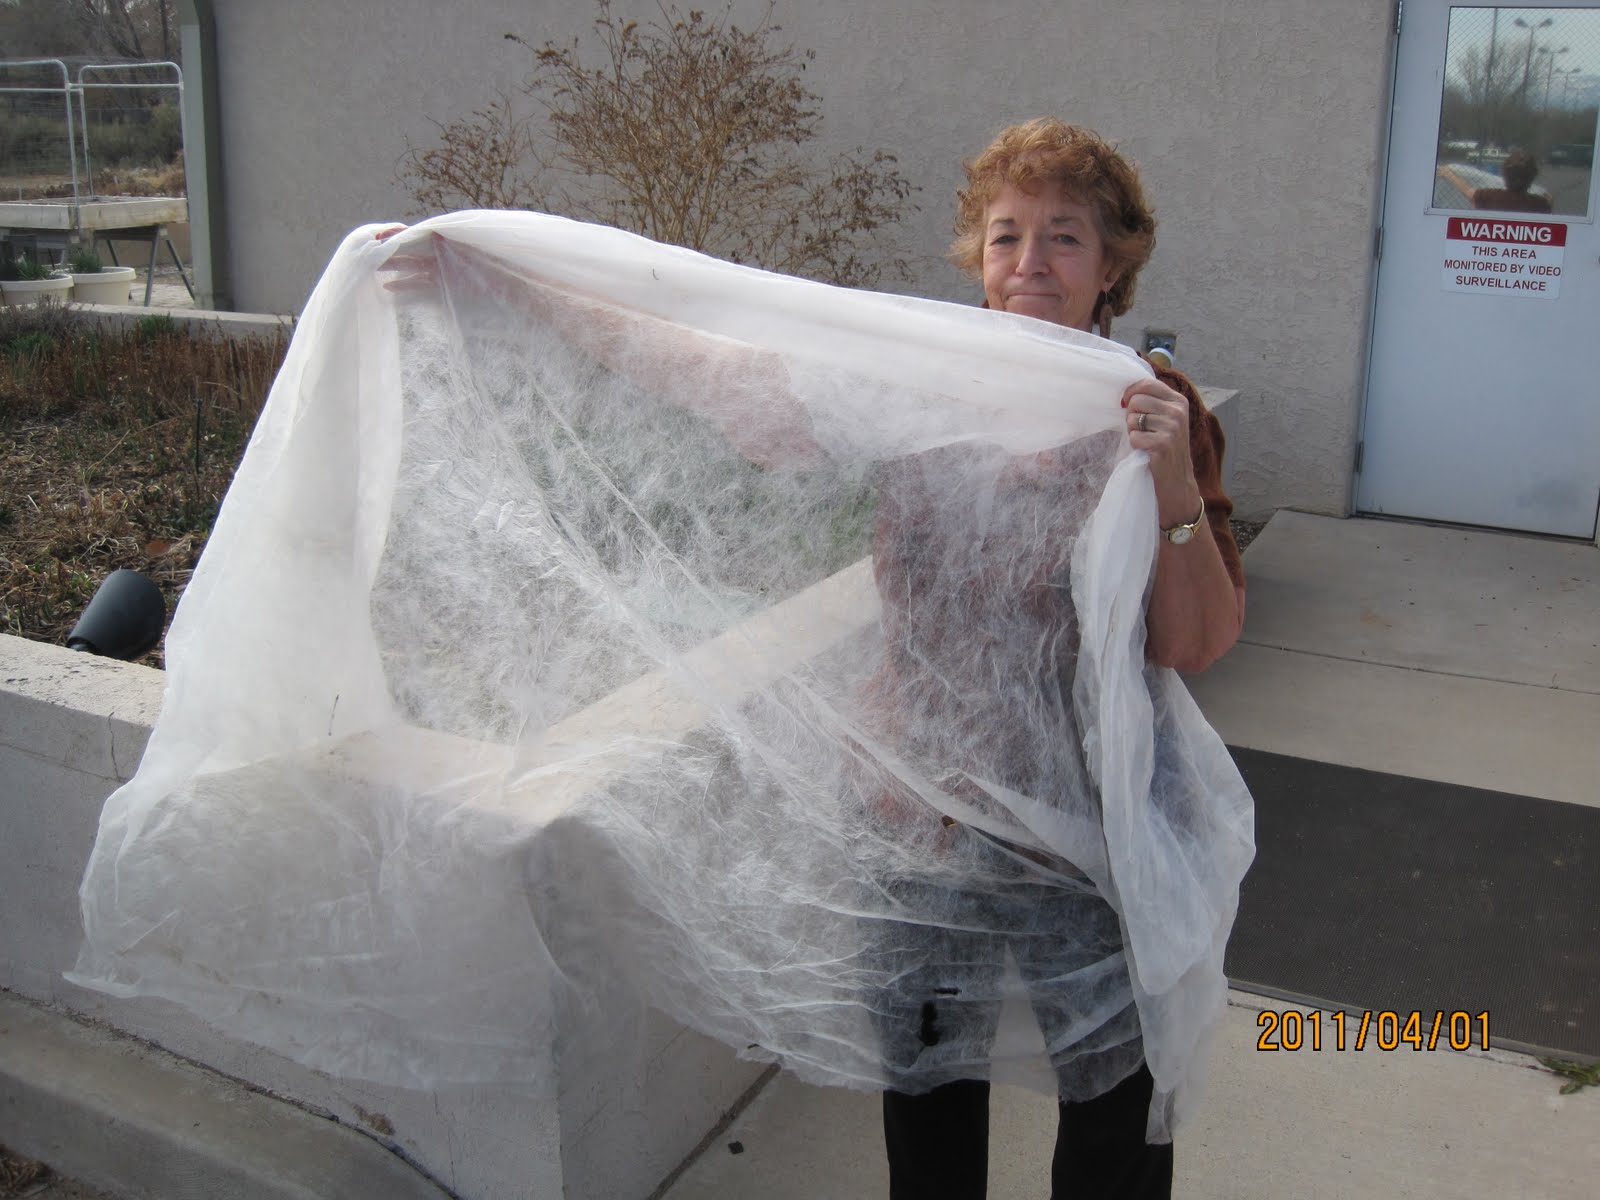 |
| Kay Wheeler holds up a piece of floating row cover (insect barrier) that can be used to shade plants. |
A number of vegetables to include tomatoes, peppers, eggplant and okra drop flower buds and young fruit when the plant’s temperature exceeds 32 degrees C. (90 degrees F.). These plants also may abort flower buds and fruit when evening air temperatures drop below 10 degrees C. (50 degrees F.). Shading the plants helps correct these problems.
Even when air temperature exceeds 32 degrees C. (90 degrees F.) shading the plants helps keep the plant below this critical temperature. When shade is provided it also helps retain night temperatures above the critical 10 degrees C. (50 degrees Fahrenheit).
Shade cloth, sheeting or even brush stuck into the ground on the south and west sides of these plants can be used. Shade cloth, sheeting or other fabrics should be suspended above the plants. This will permit insects to reach the blossoms for pollination. Brush pushed into the ground on the south and west sides of these plants will also provide the shade necessary to increase production. Shading also helps prevent sun burn on tomatoes, egg plant, okra and other vegetables improving the length of time they can be kept in storage.
 |
| Pepper fruit damaged by sunburn. |
Subscribe to:
Posts (Atom)